Installing & Activating
Installing in VPS server is fully optional. You can skip this page if you don't have a VPS server.
Requirements
Server must have these pre-installed:
- Ubuntu Operating System
- unzip
- docker
- docker compose
Please create a machine and SSH into your machine.
Process of creating a machine varies from server to server. If you are unable to figure out the process, please contact your server support team. They will help you create a machine and guide you through the SSH process.
Unzipping
Run the following command to install unzip:
bash
sudo apt-get install unzipDocker Install
Run the following commands to install Docker:
bash
sudo apt update

sudo apt install apt-transport-https ca-certificates curl software-properties-common

curl -fsSL https://download.docker.com/linux/ubuntu/gpg | sudo apt-key add -

sudo add-apt-repository 'deb [arch=amd64] https://download.docker.com/linux/ubuntu bionic stable'

sudo apt update

apt-cache policy docker-ce

sudo apt install docker-ce
If the commands fail, run the following:
bash
curl -O https://download.docker.com/linux/debian/dists/buster/pool/stable/amd64/containerd.io_1.4.3-1_amd64.deb

sudo apt install ./containerd.io_1.4.3-1_amd64.deb

sudo apt install docker-ce

sudo systemctl status docker
Docker Compose Install
Run the following commands:
bash
sudo curl -L https://github.com/docker/compose/releases/download/1.21.2/docker-compose-`uname -s`-`uname -m` -o /usr/local/bin/docker-compose

sudo chmod +x /usr/local/bin/docker-compose

docker-compose --version
Installing
After installing required applications, follow these steps:
- Make zip from Docker.
- Upload it to your server.
- Unzip it:
bash
unzip Docker.zip- Go to the project directory:
bash
cd DockerUser Adding for Docker
Run the following commands:
bash
sudo groupadd docker

sudo usermod -aG docker $USER
Backend Configuration
- Open the
.envfile:
bash
nano .env- Change the following values:
- APP_URL: URL of your admin panel (e.g. http://admin.yourdomain.com)
- FRONTEND_URL: URL of your frontend (e.g. http://www.yourdomain.com)
- Save the file:
Press CTRL + X
Press Shift + Y
Press Enter
Frontend Configuration
- Go back to root:
bash
cd ..- Enter frontend folder:
bash
cd frontend- Open
.env.prod:
bash
nano .env.prod- Change:
- API_BASE: Root URL of your admin panel (e.g. http://www.yourdomain.com)
⚠️ Do not forget to add / at the end of the URL.
- Save the file:
Press CTRL + X
Press Shift + Y
Press Enter
NGINX Configuration
- Go back to root:
bash
cd ..- Go to nginx config folder:
bash
cd nginx/config- Edit file:
bash
nano default.conf- Find
server_name(you will find it in two places):
- First occurrence → put your domain URL
- Second occurrence → put your admin URL
⚠️ Do not forget to add / at the end of the URL.
- Save file:
Press CTRL + X
Press Shift + Y
Press Enter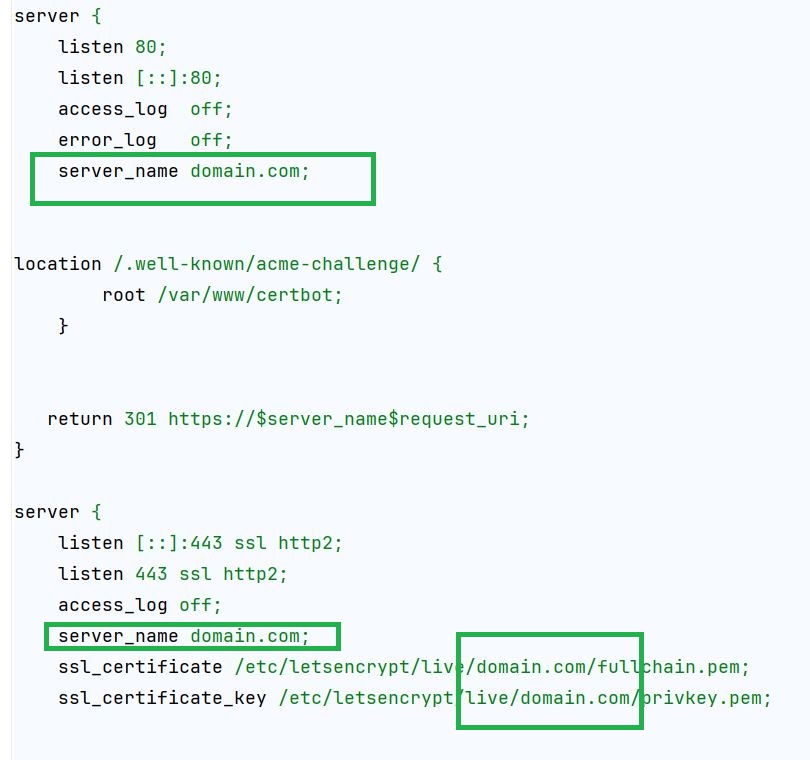

Permission & Build
- Go inside backend folder:
bash
cd backend- Set permissions:
bash
sudo chown -R $USER:www-data storage
chmod -R 775 storage

sudo chown -R $USER:www-data bootstrap/cache
chmod -R 775 bootstrap/cache

sudo chmod -R 777 public/uploads- Build and run:
bash
sudo docker-compose up -d --buildDatabase Migration
- Enter app container:
bash
docker-compose exec app bash- Clear cache:
bash
php artisan route:cache
php artisan route:clear
php artisan config:cache
php artisan config:clear
php artisan cache:clear
php artisan optimize- Run permission command:
bash
chown -R www-data:www-data resources- Run migration:
bash
php artisan migrate:fresh --seed- Now generate Passport keys
bash
php artisan passport:keys- Set permissions:
bash
chmod 600 storage/*.key
chown -R www-data:www-data storage
Clear cache again (Step 2).
Exit container:
bash
exitRebuild and Run Docker
- Go back to root:
bash
cd ..- Rebuild:
bash
sudo docker-compose down

sudo docker-compose up -d --build- Access the website:
- Admin credentials:
- Email:
admin@mail.com - Password:
123456
- Clear cache again (Database Migration Step 2).
Need Help?
If you face any difficulty during installation, please visit: